Showing posts with label small card. Show all posts

Thursday, 9 April 2020

Brighten someone's day with a rainbow card!

I decided to make several cards to leave in my neighbours' letterboxes to bring a bit of cheer to them during New Zealand's countrywide lockdown. I copied an embossing technique I saw online from a fellow demonstrator in the USA, Connie Tumm.


It's a quick and easy card to make as long as you have six different embossing folders. If you don't have that many folders, or none at all, you can create the card without embossing the coloured cardstock or maybe just emboss a few pieces.

I used cardstock from the five 2018-2020 In Colors plus Gorgeous Grape to make a my 6-colour rainbow cards. I know there are 7 colours in a rainbow (red, orange, yellow, green, blue, indigo and violet) but I didn't have enough room on my cards and I think it looks just as good without a second blue colour.


For the base of the cards I used Whisper White Note Cards & Envelopes which are 5" x 3-1/2" (12.7 x 8.9 cm) and I cut a Basic Black cardstock mat to 4-1/2" x 3" (11.5 x 7.5 cm). I also used 4" x 2-3/4" (10 x 7 cm) coloured cardstock -- Lovely Lipstick, Grapefruit Grove, Pineapple Punch, Call Me Clover, Blueberry Bushel, and Gorgeous Grape.


After embossing each coloured cardstock with a different 3-D Embossing folder (Brick & Mortar, Tin Tile, Hammered Metal, Country Floral, Scripty, Button Button) I cut each piece into 5/8" (1.5 cm) strips which gave me enough to make 6 cards.


I decorated the front of each card with a different sentiment in Memento Tuxedo Black Ink using the Stitched So Sweetly dies except for two cards which I fussy cut. Some of the cards were embellished with epoxy shapes or jewels to add a bit of sparkle to them. I even stamped the back of each envelope using my Stamparatus for accurate placement.

Back of envelope stamped with 'Stamping Your Way to the Top' stamp set
Instead of signing the cards and sealing the envelopes, I made up a poem to put inside so that the recipient could share the card with someone else.
This little card was made for you 

to brighten up your day.

If it made you smile then its job is done 

and you should send it on its way.

Please give it to someone you know 

to pass along the cheer.

Since all of us need to know 

there is always someone there! 
Have a look at my video for more details on how to make your own rainbow cards and for lots of tips on using embossing folders.


Brightening someone's day by giving them a handmade card is very satisfying, even if you don't see the recipient's face when they open the envelope.

Tuesday, 1 October 2019

World Card Making Day is Coming!

Saturday, October 5th is World Card Making Day and I decided to offer a Free Christmas Card Making Class here in my home. I've been advertising all over Facebook and other internet sites so I am hopeful that there will be a few people coming to make cards. Today I've been busy making lots of Christmas cards as samples for the class.

I will be using the Night Before Christmas Memories & More cards and envelopes in the class because it is very easy to put together a few elements to make a card quickly. However, since I didn't know what the final cards would look like I decided to spread all my supplies out on my dining table.

I grabbed some retired DSP, threads, stamps and embellishments to bling up the cards as well. Even though it looked like a card shop had thrown up all over my table, it was an organised mess!

My original plan was to create four sample cards for the attendees to choose from but once I started combining my supplies together I created 10 cards and I could have kept going! I even got out last year's Poppy Parade coloured cards and envelopes which worked well with some of the images in the Night Before Christmas card pack. I was trying to create simple cards in case those attending were new to papercrafts, but I couldn't help but add embellishments and die cuts.

So I ended up with 5 samples of beginner cards and 5 samples of more complicated cards. I will let those who show up have a choice of which one they would like to make or they can just create their own card from the supplies I will have on the table -- once I clean up my mess! 😅
I could spend days playing with this set by fussy cutting and punching out all sorts of shapes from the cards since the colours coordinate so well and with just a few extra elements I would have 50 Christmas cards. But I didn't want to make things too difficult since I want to get people interested in card making and not scare them away! I will do some more 'messing' about with the cards that are left over after Saturday to make more Christmas cards for my markets and future classes because for me . . . everyday is Card Making Day! 💟


#KeepCalmAndCraft #ComputerAndCraftDesigns #StampinUp #creativetherapy #StayHome #PaperCraftIdeas #ChristmasCard #MemoriesAndMore

Sunday, 5 May 2019

Quick and Easy Crafting with Kits


Sometimes I lose my crafting mojo and even though I can find lots of beautiful things to create online, when I sit down at my table I feel overwhelmed. That is when a kit comes to the rescue!

Much like going to a class, a kit provides you with everything you need to make several projects. The only thing missing is the teacher and classmates, but sometimes I just want to be alone and do my crafting in the comfort of my pajamas. I certainly can't do that at a class! 😉

When I became an independent Stampin' Up! demonstrator over 2 years ago I bought a couple kits from the current catalogue. I followed the instructions and made all the cards exactly as shown in the pictures. This quickly gave me a large quantity of cards to offer for sale at the craft markets I started attending and I didn't have to invest a lot of money in full products to make things.

Cards from 2017-18 All-Inclusive Kits
Now that I am a 'seasoned' demonstrator I still use kits for a variety of reasons. Even though Stampin' Up! offers a multitude of coordinating products and has a beautiful catalogue with hundreds of fabulous project ideas sometimes I just need something quick and easy to do. That is why the kits come in different styles, depending on what the crafter wants and needs -- all-inclusive kits, project kits and limited-time kits.

Different kits from the 2018-19 catalogues
I love kits because of the versatility of the products they have which allows me to make cards quickly or I use the items to create other projects. Using a kit is a great way to try different things without having to purchase a full set of products. With a kit you can use different embellishments, such as twine, vellum, glitter paper, foil paper, pearls, ribbons, dsp and dimensionals. Some kits also have different shapes and sizes of cards and envelopes as well as different cardstock colours. The other great thing is you get to play with cutout shapes without having a die cutting machine or a punch.

Another wonderful benefit of using kits is you get exclusive products which usually cannot be purchased separately. Each kit comes with an ink spot, cards, envelopes and embellishments created just for that kit. So purchasing several kits with different ink colours will allow you to collect a supply of ink without having to invest in the full-size ink pads. I personally prefer using ink spots with the Stamparatus as it creates less mess on the plates. The spots are also easier to travel with.

The 'All-Inclusive' kits come with everything you need to make the cards -- stamps, ink, cards, envelopes, embellishments and dimensionals. These kits are great for 'on the go' crafting as you have everything you need except for scissors, Tombow multipurpose liquid glue or Tear & Tape adhesive. The supplies usually come in a sturdy box for easy storage or you can use the box as gift packaging when you complete your kit. The kits usually come with matching envelopes so you are ready to post the cards once you are done. When you complete an 'all-inclusive' kit you then have stamps and an ink spot to use for other projects which is why these kits cost a bit more than other kits.

Made To Bloom all-inclusive card kit #148537 $57 NZD
Lots of Happy all-inclusive card kit #146388 $74 NZD
Soft Sayings all-inclusive card kit #145466 $74 NZD
The 'Project' kits do not come with stamps as the stamp set is sold separately. So you can use any stamp set you have to complete the cards in this type of kit or you can purchase the recommended stamp set to make them as shown in the instructions. The benefit of having the stamp set separate from the kit is that you can purchase more than one kit if you wish to make a lot of cards and you won't end up with duplicate stamps. Sometimes these kits include an exclusive item, such as the clear storage box in the 'Incredible Like You' project kit. You will need to use your own scissors, adhesive, inks and stamps to complete the cards in a project kit, however that is reflected in the lower price.

Incredible Like You project kit #148552 $57 NZD
Matching Incredible Like You stamp set #148708 $36 NZD
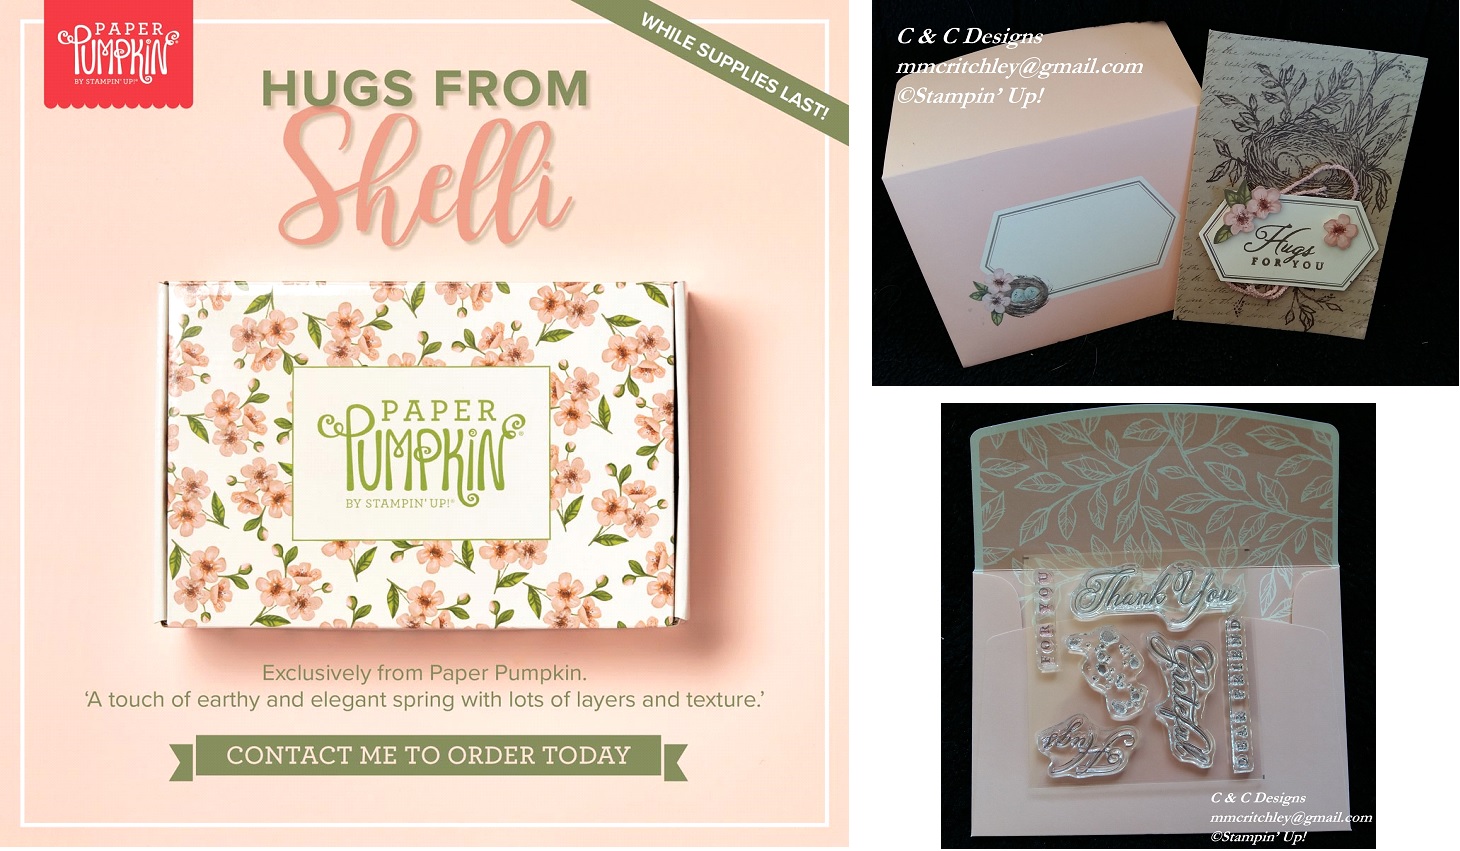
Occasionally Stampin' Up! comes out with limited-time offers and on May 15th there will be an exclusive kit offered here in New Zealand. In the USA and Canada, crafters can subscribe to a stamping kit from Paper Pumpkin which has exclusive Stampin' Up! products in it each month. However for one time only, we will be able to get a kit from Paper Pumpkin which is called the 'Hugs From Shelli' kit and it will include an exclusive stamp set not available anywhere else, one Classic Stampin’ Spot®, paper and crafting materials to create 12 cards (3 cards of 4 unique designs), 12 coordinating envelopes, adhesives and embellishments for all 12 cards in a decorated storage box.

This kit was created with the help of Shelli Gardner, co-founder of Stampin' Up! It will only cost $44 NZD and is available for a limited time, so if you'd like one of these kits please let me know asap as when they sell out they will be gone forever. The Paper Pumpkin kits are always a surprise so I can't show you what will be in it as I don't know, however I was lucky enough to get to make one of the exclusive cards when I attended OnStage last month and I even got to keep the photopolymer stamps!


Hugs from Shelli Paper Pumpkin kit #152032 $44 NZD
When I am pressed for time, I sometimes use a kit for one of my classes so I don't have to prep all the different elements for the cards. Kits are also wonderful if you need a lot of a similar cards made quickly, such as birthday or thank you cards. Sometimes just making a few cards from a kit can get my mojo going so I can then get back into my creative groove!

#ComputerAndCraftDesigns #StampinUp #creativetherapy #PaperCraftIdeas #HandmadeGifts #HandmadeCard #PapercraftKit

Wednesday, 10 April 2019

Swaps

Today I am off to Auckland to stay in an apartment with fellow Stampin' Up! demonstrators from my upline. We are going to be attending OnStage Live at Sky City Convention Centre. This 3-day event will be lots of fun for everyone attending as we get to play with some new products, see demonstrations, mingle with other demonstrators from all around the world, and get a sneak peak at the upcoming annual catalogue, which goes live on June 1st.

One of the fun things I love to do every time I go to OnStage (the event happens twice a year) is make things to swap with other demonstrators. I usually make 3-D objects such as boxes or little baskets but this time I decided to make some small cards. I can't wait to see all the creative gifts I receive in exchange for my swaps. I will be sure to show pictures of them in a future post, but for now I'd like to share how I made the 100 cards I have to give to other demonstrators.


I chose to use the dog and cat stamp sets with matching punches for my cards -- Happy Tail, Dog Builder Punch, Nine Lives and Cat Punch. I first designed the 3" x 3" silhouette cards in black and white. However I don't like to waste anything so I stamped the animal images on one side of the whisper white square using my Stamparatus.

Then I cut the animals out with the matching punches. I turned the 'negative' card over and again used the Stamparatus to stamp the sentiment on each one. I love using my Stamparatus to make multiple cards as I can line each piece of the card up perfectly to get identical images quickly. 

I stamped small hearts on a piece of whisper white cardstock for the inside of each card along with a matching sentiment -- Meow! or Ruff! Then it was just a matter of adhering each layer to the 3" x 3" card bases and putting a red heart, made from the dog punch, on each silhouette. Of course I had to stamp a cute image on the matching envelopes. 


I made one larger card using the punched out animals from two smaller cards. I used Wood Textures (1" x 4") and Gingham Gala (3" x 4") designer series paper along with matching cardstock to make a 3.875" x 4.125" card (9.9 cm x 10.5 cm). This sizing allowed me to get three cards from one A4 piece of cardstock without any waste, however you will have to adjust these sizes if you are using letter-sized paper. I used my Stamparatus to place the sentiment on the top left corner of the Gingham Gala paper. Besides allowing me perfect placement, using the Stamparatus let me stamp the words again if the Memento ink didn't come out evenly.

I adhered the DSP to the front of the card as shown in the pictures (overlapping the Gingham Gala with the Wood Texture dsp) and popped the animals up on dimensionals along with a stamped heart cut out from the dog punch. For the inside of the card I stamped the sentiment from the Happy Tails stamp set along with a paw print.

I hope you've enjoyed seeing my swaps for OnStage and if you are one of the demonstrators I get to swap with, thank you very much!

#ComputerAndCraftDesigns #StampinUp #creativetherapy #PaperCraftIdeas #HandmadeCard #Swaps #OnStage #AucklandOnStage #MiniCard