Friday 21 July 2023

Christmas in July -- Let's Go Shopping Advent Calendar!

I recently got my hands on the Let's Go Shopping Collection of products from Stampin' Up! Originally I planned to make an Advent Village with the building images from the Les Shoppes Designer Series Paper, but once I began playing with the stamps and dies I decided to make an Advent Calendar with them. I also used the numbers from the Days To Remember stamp set because they were small enough to fit into each little window.

It was also an excuse to use the hobby blade from the new Take Your Pick Crafter Tips. This blade made it so easy to cut around the windows and then use the small stylus from the original Take Your Pick Tool to score the left side of each window to make them open up, just like an advent calendar.


I cut up pieces of the Les Shoppes Designer Series Paper to put behind each window, creating different floors for my department store -- clothing, books, paints/crafts, ice cream and bakery.

The bottom floor was for the restaurant which has a Christmas tree and presents to be opened on Christmas day!

The dies in this set made it so easy to decorate the building with garland, street lamps, menu board and a potted plant. I used the red Pearlised Enamel Effects Basics lacquer to create berries on the garland and baubles on the tree. I coloured the building with a variety of Stampin' Blends alcohol pens with the main colours of Pecan Pie, Smoky Slate, Misty Moonlight and Pool Party. Of course I had to add some Wink of Stella to the windows to create a reflective glass-look!

I used some retired products to finish off my project -- a die cut wreath, stamped tree and sentiment from the Trees For Sale bundle as well as adhesive-backed snowflakes to make it into a wintery scene.

Here's a short video to show you the details up close.

I hope you like this project and check back soon to see the Advent Village I will make with the Les Shoppes DSP!

#ComputerAndCraftDesigns #StampinUp #CreativeTherapy #KeepStamping #CardMaking #LetsGoShopping #AdventCalendar #LesShoppes #KeepCalmAndCraft 

Thursday 20 October 2022

Labour of Love!

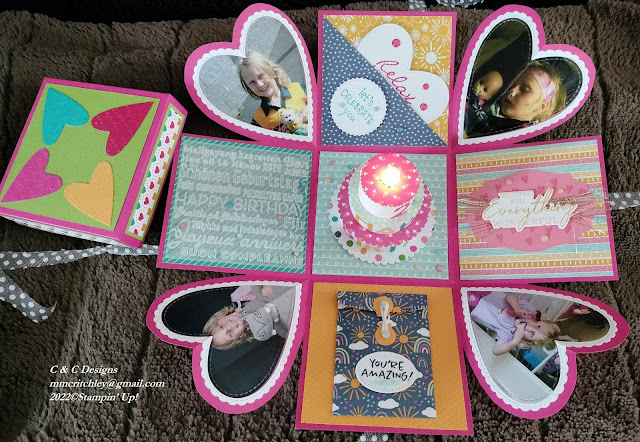
Twenty-one years ago I laboured to give birth to my youngest daughter so it only seemed fitting to create a very special card to celebrate her birthday.

This large box card was a true labour of love and very fun to create!

I've been wanting to make an 'explosion' box card for some time, so this special birthday was the perfect excuse for me to try this fun fold design.

I used retired designer series paper to decorate this card box -- Pattern Party on the outside and Sunshine & Rainbows on the inside. The DSP determined my colour scheme and inks.


The box was made from a 12" x 12" piece of Melon Mambo cardstock scored at 4" on all sides. I made the lid from a 6" square piece of Melon Mambo cardstock and scored it at just under 1" on all four sides so that it would be slightly larger than the 4" square box.


I die cut hearts for each corner from Basic White cardstock using the largest heart from the retired Be Mine Stitched Dies. I also traced around that same die to make each heart-shaped corner for my box.


The Mini Pocket Envelope Dies were the perfect choice to make a little pocket to hide $21 inside for the birthday girl because she is Amazing!


I used one of the Let's Celebrate Embossing Folders on vellum to make the 'Happy Birthday' section of the box.


The Charming Sentiments Bundle allowed me to find the perfect words to place over some frayed gold ribbon on top of one of the Stylish Shapes Dies.


I created a triangular pocket out of designer series paper on one side to hide a little message which allowed me to sign the 'card'. The white heart was the inside of one of the larger corner heart die cuts.


I printed six photos of my daughter at various ages on paper and then die cut them with the largest heart from the Be Mine Stitched Dies to personalise this special box.


The tealight multi-tiered cake was another project I had been wanting to make and I personalised it with the Playful Alphabets Dies. 

I made sure to make the cake hollow so I can easily turn on the tealight. You can learn how to make a cake in my video below.

I've also made another little video showing this special card in close-up view along with explanations of how I made it. All the products I used are listed in the description of the video.

Even though I used a lot of retired products to make this special gift card, you can make your own using whatever you have at hand or purchase some similar products from Stampin' Up!

#KeepCalmAndCraft #ComputerAndCraftDesigns #StampinUp #CreativeTherapy #KeepStamping #CardMaking #ExplosionBox #PaperCake #21stBirthday


Wednesday 10 August 2022

Getting to know your Gnome Dies!

Sometimes a die set comes along with some pieces which you aren't sure how they are meant to be used. In this blog I'll explain how to use some of the smallest pieces in the set of Gnomes Dies from Stampin' Up! 

Gnomes Dies
There are five large framing dies which allow you to die cut the stamped images from the Kindest Gnomes stamp set -- four gnomes and the large mushroom.

The Kindest Gnomes Bundle includes the Kindest Gnomes Stamp Set and the Gnomes Dies
You can also use some of those dies to cut out a few images from the matching designer series paper -- Storybook Gnomes.

The other dies in this set allow you to create a paper-pieced gnome and build a scene with some mushrooms and grass.

However there is one little die that seems out of place in this set until you notice that it fits into the space at the top of the hat die. This little die allows you to cut a hole in the top of the gnome's hat. 

Why would you want a hole in the top of a hat, you ask? Well, the possibilities are only limited by your imagination!
You could use the hole to create a banner of gnomes.
You could use it to turn the gnome into a tag.
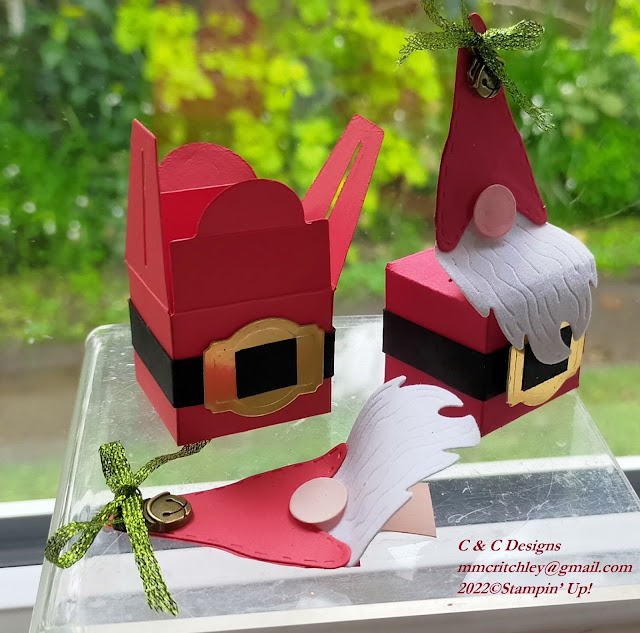
You could use it to add decorative ribbon to hang a trinket from.*

You can change the look of the paper-pieced gnome by giving it arms. I used the 'nose' pieces (ovals) to create hands and the top of the mushrooms as arms. 

The embossed lines of the mushroom dies look like sleeve stitching to me. Have a look at my video to see how to create your own little gnome.

I hope I've inspired you to make the most out of your dies and remember to try to use them differently. You might just surprise yourself!

* Check out my previous blog for more information about the Santa gnome treat box.

#KeepCalmAndCraft #ComputerAndCraftDesigns #StampinUp #CreativeTherapy #KeepStamping #ChristmasGiftIdea #CardMaking #TreatBox #KindestGnomes #SantaTreatBox 

Saturday 30 July 2022

Dress up your gift giving with the Design a Treat Box Dies!

I've been having lots of fun playing with the new Design a Treat Box Dies from Stampin' Up! There is so much you can do with these dies along with the coordinating stamp set. This bundle allows you to make treat boxes for a variety of occasions -- birthdays, anniversaries, Easter, Halloween, Christmas and other celebrations.

I started by die cutting the little box from different papers -- cardstock, designer series paper, and glimmer sheets -- to see how the boxes come together. Then I couldn't stop creating! I just had to try out the different dies in this set.

I found that in order to still be able to open the boxes you need to die cut two of the top pieces (bow or bats) and glue them together just at the top so the centre will remain open. You can then slip it over the half-circle at the top of the box to decorate it.

When I first saw the dies in the Annual Catalogue I couldn't wait to get them to make a snowman. I stacked two white boxes for the body of the snowman with two 'branch' arms between them. I drew a face on the top box and used gems for the eyes and nose. I then made a little top hat from Basic Black cardstock and attached it to one side of the box top so that it could still be opened and closed.

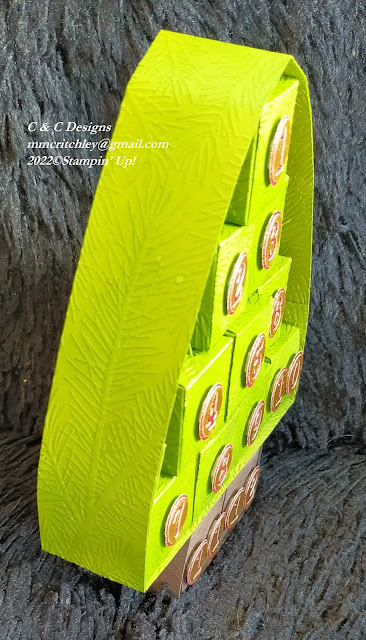
The die set includes numbers from 0 to 9 so I decided to make an advent calendar tree. 

I used a piece of adhesive sheets on the back of gold foil before die cutting the numbers. This allowed me to easily attach them to my project. I chose to use the 'negative' image on red glimmer paper for my numbers. I will save the rest of the gold numbers for another project.

I die cut 12 boxes, 10 in Old Olive and 2 in Early Espresso cardstock.


I embossed the green pieces with the pine branch folder from the Wintry 3D Embossing Folders set and the brown cardstock with the Timber 3D Embossing Folder to give them some texture. 

I enhanced the embossing on the green pieces by using a blending brush to add a little Old Olive ink to them.

By stacking the boxes sideways I was able make the tree so you can remove one box at a time to get the treats out. 

The boxes are small so you can only fit a Hersey Kiss or two in them. You could put an inspirational message inside each box or maybe a hint for a scavenger hunt to find a bigger gift!

After creating all these projects I had an idea of sticking four boxes together so they would fold up to create a bigger box, but it wouldn't stay closed so I just left the pieces on my table. When I went back to my table a day or two later, I thought the connected boxes looked like a caterpillar until I started playing with some of the die cut wings. Next thing I know, I was creating a dragon!

I used the wing die to create the arms, legs, tail and of course wings for my dragon. I created the look of scales with a spotty stamp from the Perfect Pomegranate host stamp set.

I had glued adjoining flaps together so that each box was connected but could still be opened. So this little dragon can hold lots of treats!

The eyes were made using the zero die and the oval die with some glimmer paper. I used more glimmer paper to make the flames using the antler die and the zero die for the mouth to 'blow' the flames out! I think my little dragon turned out really cute.


I am very surprised by how many different projects I made with these very versatile treat box dies. You can see them all in my video as well as a cute Santa 'gnome' to go along with the reindeer!

What would you make with these little boxes?


Saturday 5 March 2022

You Matter to the World!

Today I was going to make some cards for St. Patrick's Day and as I looked through my sentiment stamp sets I came across the Inspired Thoughts set which had words that made me think of the war in Ukraine. I then saw my Celebrate Sunflowers Bundle and knew I needed to make a card to express my feelings.

I gathered together some Balmy Blue and Bumblebee Cardstock to symbolise the colours of the Ukrainian flag which reminds me of my Swedish heritage. The Here Together Bundle was perfect for these cards because of the meaningful words. I used the Here For You Dies to cut the words 'you matter' out of blue cardstock which I glued to a piece of yellow to create the bottom of one card. The top of the card was the same size in blue just like the Ukrainian flag.


I decided to use the negative piece for a second card so I carefully glued all the little blue pieces on to some yellow cardstock. This created the bottom of my second card. I continued using both parts of my die cuts for each card to create the sunflowers and leaves. I stamped the largest sunflower from the Celebrate Sunflower Stamp Set using Bumblebee ink on balmy blue cardstock before die cutting it. I then used the largest detailed Sunflower Die to cut a flower from the yellow Simply Marbleous Designer Series Paper and glued the outline on to that piece to make a yellow and blue flower.

To make my second flower I used part of an Adhesive Sheet on Basic White Cardstock to help me stick down all the little inside pieces of the large sunflower die cut. I die cut another sunflower outline with Basic Black Cardstock and stuck that down on the white cardstock to add contrast to the sunflower. This one was popped up using some dimensionals on the top of the 'flag' card.

I masked off some of the words on two stamps from the Here Together set to create the inside sentiments for the 'flag' card and added a small stamped sunflower coloured with some Stampin' Blends.

The words 'Sheltering you with love at a time when words fall short' from the Inspired Thoughts stamp set matched perfectly for the inside of the card that I had stamped 'know that you are loved' from the Celebrate Sunflower Stamp Set.

I am so grateful I can craft when I feel anxious about what's happening in the world around me. I hope you too have some way to relax in this ever-changing world. Stay Safe and Keep on Crafting!

#KeepCalmAndCraft #ComputerAndCraftDesigns #StampinUp #CreativeTherapy #KeepStamping #RubberStamping #CardMaking #CelebrateSunflowers

Wednesday 2 February 2022

Card Making -- from Simple Stamping to Embellished Cards in a few easy steps!

When I tell people what I do as an independent Stampin' Up! demonstrator I often hear them say, "I could never do that because I'm not creative." I don't see myself as creative, artistic or even talented. That's the genius of stamping . . . you can make something that looks great with just a stamp, ink and paper. In this blog I'll show you how to make a simple card and then step it up to a more embellished card with just a few extra steps.

First choose a stamp set (or two), some cardstock, and one coloured ink pad. I used the Amazing Silhouettes cling stamps for the focal point of my cards and choose the words 'thank you' from another stamp set. For my first cards I simply stamped one image and the words directly on to Basic White cardstock.

Simple Stamping with Amazing Silhouettes stamp set

I was able to quickly create some simple thank you cards in three different sizes -- 3" x 3", notecard and Memories & More small card size. The ink colours I used were Granny Apple Green, Polished Pink and Soft Succulent. By using just one colour on white it created a simple elegant card which anyone can make!

Stepped up cards made with the Amazing Silhouettes stamp set

I then added a few more elements to a basic card to step it up. I used the same image and coloured ink on white but this time I layered it onto a coloured A5 (14.85 x 10.5 cm) card base and added some ribbon. By fussy cutting the sentiment and popping it up using some Mini Stampin' Dimensionals I created a bit of depth to the flat card which made it look completely different than the original, however it didn't take much more time or effort than my original cards.

Embellished cards using the Amazing Silhouettes stamp set along with some die cutting

For my more embellished cards I introduced some die cutting, jewels/pearls, ribbon, and embossing. These cards took a little longer to make but the same starting elements were there -- stamp, ink and paper. I explain how I created of these 'avid crafter' cards under each of the photos below.

Embellished card using Amazing Silhouettes stamps in Granny Apple Green colour
This card started out the same as my 'casual crafter' card but I added more stamped images and then die cut the white layer using the Stitched Greenery die. I used the small label die from the Harvest dies set for the sentiment which is layered on top of Granny Apple Green Sheer Ribbon and White 3/4" (1.9 cm) Frayed Ribbon. I heat embossed a leaf image on Basic White cardstock in White Embossing Powder and and then coloured it in with a Granny Apple Green Stampin' Write pen before fussy cutting it out. I placed the leaf image on top of two circles made from the Layering Circles dies with some white thread sticking out from behind the middle layer. I finished off the card with three Iridescent Rhinestone Basic Jewels.

Embellished card using Amazing Silhouettes stamps in Polished Pink colour
To make the butterfly on the background of my pink card I 'stamped off' the image before stamping it on the Basic White cardstock to create a faded look. I stamped it again on a scrap piece of cardstock and then fussy cut it out, placing it in the centre of the card with some Stampin' Dimensionals to add height. I used the Meadow dies to cut out two butterflies and a shape for the sentiment out of Rose Gold Metallic Specialty Paper. I attached the sentiment to the card front with Polished Pink 3/8" (1 cm) Open Weave RibbonOf course I used some Iridescent Rhinestone Basic Jewels to bling up the card!

Embellished card using Amazing Silhouettes stamps in Soft Succulent colour
I really enjoyed making this tree card as it uses a lot of different techniques. I stamped the tree image from the Amazing Silhouettes cling stamps three times on a layer of Basic White cardstock. I used the same tree stamp to create the grass at the bottom of the card by just stamping it multiple times in different spots. I heat embossed the words on Soft Succulent cardstock in White Embossing Powder for the sentiment. I used the Beautiful Trees Dies on Basic White cardstock to cut out the birds and tree trunk. I used the same die set to cut the foliage and sentiment in Soft Succulent cardstock. I added some colour to the foliage by stamping it multiple times with the tree stamp. I layered everything on the front of the cards using Mini Stampin' Dimensionals. I finished the card off with some baker's twine and Pearl Basic Jewels.

Granny Apple Green cards

Polished Pink cards

Soft Succulent cards

Whether you like simple cards or more complicated ones I hope I've inspired you to try stamping. There is always something available for the simple, casual or avid crafters from Stampin' Up! So if there is any way I can help you in your crafting journey, please let me know.

Happy Crafting!

#KeepCalmAndCraft #ComputerAndCraftDesigns #StampinUp #CreativeTherapy #KeepStamping #RubberStamping #CardMaking #SimpleStamping