Showing posts with label die cut. Show all posts

Saturday, 5 March 2022

You Matter to the World!

Today I was going to make some cards for St. Patrick's Day and as I looked through my sentiment stamp sets I came across the Inspired Thoughts set which had words that made me think of the war in Ukraine. I then saw my Celebrate Sunflowers Bundle and knew I needed to make a card to express my feelings.

I gathered together some Balmy Blue and Bumblebee Cardstock to symbolise the colours of the Ukrainian flag which reminds me of my Swedish heritage. The Here Together Bundle was perfect for these cards because of the meaningful words. I used the Here For You Dies to cut the words 'you matter' out of blue cardstock which I glued to a piece of yellow to create the bottom of one card. The top of the card was the same size in blue just like the Ukrainian flag.


I decided to use the negative piece for a second card so I carefully glued all the little blue pieces on to some yellow cardstock. This created the bottom of my second card. I continued using both parts of my die cuts for each card to create the sunflowers and leaves. I stamped the largest sunflower from the Celebrate Sunflower Stamp Set using Bumblebee ink on balmy blue cardstock before die cutting it. I then used the largest detailed Sunflower Die to cut a flower from the yellow Simply Marbleous Designer Series Paper and glued the outline on to that piece to make a yellow and blue flower.

To make my second flower I used part of an Adhesive Sheet on Basic White Cardstock to help me stick down all the little inside pieces of the large sunflower die cut. I die cut another sunflower outline with Basic Black Cardstock and stuck that down on the white cardstock to add contrast to the sunflower. This one was popped up using some dimensionals on the top of the 'flag' card.

I masked off some of the words on two stamps from the Here Together set to create the inside sentiments for the 'flag' card and added a small stamped sunflower coloured with some Stampin' Blends.

The words 'Sheltering you with love at a time when words fall short' from the Inspired Thoughts stamp set matched perfectly for the inside of the card that I had stamped 'know that you are loved' from the Celebrate Sunflower Stamp Set.

I am so grateful I can craft when I feel anxious about what's happening in the world around me. I hope you too have some way to relax in this ever-changing world. Stay Safe and Keep on Crafting!

#KeepCalmAndCraft #ComputerAndCraftDesigns #StampinUp #CreativeTherapy #KeepStamping #RubberStamping #CardMaking #CelebrateSunflowers

Wednesday, 2 February 2022

Card Making -- from Simple Stamping to Embellished Cards in a few easy steps!

When I tell people what I do as an independent Stampin' Up! demonstrator I often hear them say, "I could never do that because I'm not creative." I don't see myself as creative, artistic or even talented. That's the genius of stamping . . . you can make something that looks great with just a stamp, ink and paper. In this blog I'll show you how to make a simple card and then step it up to a more embellished card with just a few extra steps.

First choose a stamp set (or two), some cardstock, and one coloured ink pad. I used the Amazing Silhouettes cling stamps for the focal point of my cards and choose the words 'thank you' from another stamp set. For my first cards I simply stamped one image and the words directly on to Basic White cardstock.

Simple Stamping with Amazing Silhouettes stamp set

I was able to quickly create some simple thank you cards in three different sizes -- 3" x 3", notecard and Memories & More small card size. The ink colours I used were Granny Apple Green, Polished Pink and Soft Succulent. By using just one colour on white it created a simple elegant card which anyone can make!

Stepped up cards made with the Amazing Silhouettes stamp set

I then added a few more elements to a basic card to step it up. I used the same image and coloured ink on white but this time I layered it onto a coloured A5 (14.85 x 10.5 cm) card base and added some ribbon. By fussy cutting the sentiment and popping it up using some Mini Stampin' Dimensionals I created a bit of depth to the flat card which made it look completely different than the original, however it didn't take much more time or effort than my original cards.

Embellished cards using the Amazing Silhouettes stamp set along with some die cutting

For my more embellished cards I introduced some die cutting, jewels/pearls, ribbon, and embossing. These cards took a little longer to make but the same starting elements were there -- stamp, ink and paper. I explain how I created of these 'avid crafter' cards under each of the photos below.

Embellished card using Amazing Silhouettes stamps in Granny Apple Green colour
This card started out the same as my 'casual crafter' card but I added more stamped images and then die cut the white layer using the Stitched Greenery die. I used the small label die from the Harvest dies set for the sentiment which is layered on top of Granny Apple Green Sheer Ribbon and White 3/4" (1.9 cm) Frayed Ribbon. I heat embossed a leaf image on Basic White cardstock in White Embossing Powder and and then coloured it in with a Granny Apple Green Stampin' Write pen before fussy cutting it out. I placed the leaf image on top of two circles made from the Layering Circles dies with some white thread sticking out from behind the middle layer. I finished off the card with three Iridescent Rhinestone Basic Jewels.

Embellished card using Amazing Silhouettes stamps in Polished Pink colour
To make the butterfly on the background of my pink card I 'stamped off' the image before stamping it on the Basic White cardstock to create a faded look. I stamped it again on a scrap piece of cardstock and then fussy cut it out, placing it in the centre of the card with some Stampin' Dimensionals to add height. I used the Meadow dies to cut out two butterflies and a shape for the sentiment out of Rose Gold Metallic Specialty Paper. I attached the sentiment to the card front with Polished Pink 3/8" (1 cm) Open Weave RibbonOf course I used some Iridescent Rhinestone Basic Jewels to bling up the card!

Embellished card using Amazing Silhouettes stamps in Soft Succulent colour
I really enjoyed making this tree card as it uses a lot of different techniques. I stamped the tree image from the Amazing Silhouettes cling stamps three times on a layer of Basic White cardstock. I used the same tree stamp to create the grass at the bottom of the card by just stamping it multiple times in different spots. I heat embossed the words on Soft Succulent cardstock in White Embossing Powder for the sentiment. I used the Beautiful Trees Dies on Basic White cardstock to cut out the birds and tree trunk. I used the same die set to cut the foliage and sentiment in Soft Succulent cardstock. I added some colour to the foliage by stamping it multiple times with the tree stamp. I layered everything on the front of the cards using Mini Stampin' Dimensionals. I finished the card off with some baker's twine and Pearl Basic Jewels.

Granny Apple Green cards

Polished Pink cards

Soft Succulent cards

Whether you like simple cards or more complicated ones I hope I've inspired you to try stamping. There is always something available for the simple, casual or avid crafters from Stampin' Up! So if there is any way I can help you in your crafting journey, please let me know.

Happy Crafting!

#KeepCalmAndCraft #ComputerAndCraftDesigns #StampinUp #CreativeTherapy #KeepStamping #RubberStamping #CardMaking #SimpleStamping


Thursday, 20 January 2022

Perpetual Calendar with Interchangeable Images

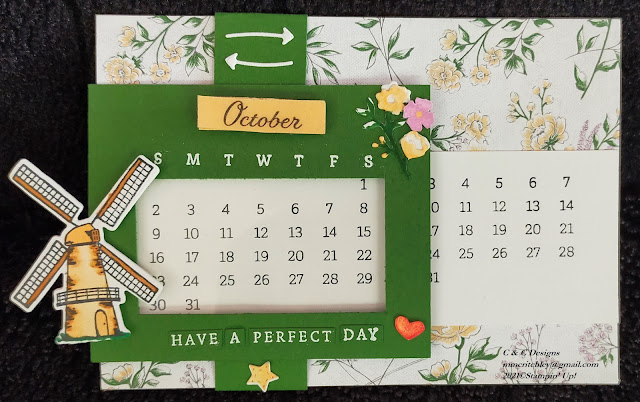
Ever since I got the Days To Remember photopolymer stamp set from Stampin' Up! I've been wanting to make a perpetual calendar. However I haven't had time to come up with my own idea and then I saw a fabulous sliding card designed by fellow demonstrator, Jessica Lewis. I changed her design to fit the A4 cardstock I was working with and used a different colour scheme and designer series paper (DSP) to make my perpetual calendar.

I used the image and dies from Nature's Harvest for January.

While making the card I had an idea to make it even more fun to use. I added a couple magnets to the left side of the slider so I could change out the image. I then stamped, coloured and cut out a dozen images on basic white cardstock. I put two magnets on the back of each image before covering them with some cardstock so they could be placed on the left of the slider each month.

I also stamped out the extra little images from the Days to Remember stamp set -- flower, star and heart -- cut them out of basic white cardstock and then put a little bit of Tombow Multipurpose Liquid Glue behind each, leaving the glue to dry. This made the glue tacky so the pieces could be repositionable. I put a piece of window sheet behind the opening so that I could put the extra pieces over any numbers not needed for the month I was viewing, like February.

February brings valentine's from the bear in the Count On Me stamp set.

March is my birthday month so I got a balloon from the Hey Birthday Chick stamp set!

I had a lot of fun searching through new and old stamp sets to find pictures I wanted for each month.

April is autumn here in New Zealand so a tree from Beauty of Friendship is perfect this month.

Celebrate Mother's Day in May with a bouquet of flowers from the Blessings of Home stamp set.

June is a chilly winter month here in New Zealand so I used a snow covered tree from the Cabin Dies.

Mid-winter means dreaming of far away places in July with the Sailing Home lighthouse.

August welcomes spring with Flowering Tulips coming through the cold ground.

Celebrate Father's Day in September here in New Zealand with a tie from Handsomely Suited.

October brings thoughts of upcoming summer holidays using the Tulip Fields Bundle.

Count On Me stamps return with a summery kangaroo for the month of November.

A little black kitty from the Sweet Little Stockings set reminds me that Christmas is coming.

Here in New Zealand our seasons and holidays are different than the rest of the world, so I chose a variety of animals, flowers and buildings for my calendar.

I also created a pocket inside with matching Heart & Home DSP so that I can easily store all my images.

I hope you like my card/calendar and if you'd like to make your own have a look at Jessica's video for instructions. Just make the few changes I mentioned above if you'd like yours to have interchangeable images like mine.

#KeepCalmAndCraft #ComputerAndCraftDesigns #StampinUp #CreativeTherapy #KeepStamping #RubberStamping #CardMaking #PerpetualCalendar #FunFoldCard

Saturday, 13 February 2021

Let's have fun with the Sand & Sea!

The Sand & Sea products are one of my favourite collections in the new mini catalogue by Stampin' Up!

All the products work so well together -- Friends Are Like Seashells Photopolymer Stamps, Seaside Seashells Dies, Seashells 3D Embossing Folder, Opal Rounds self-adhesive gems, Seaside Shells stickers, Pearlescent Specialty Paper, and the Sand & Sea Designer Series Paper. You can stamp five of the shells on the large die cut image and them emboss them all in one go with your Cut & Emboss Machine!

Then you can use it as one large background image on a card or you can cut away each seashell to use them individually.

I even combined the two methods by attaching five stamped shells onto the large die cut image (Old Olive cardstock) and placed them on some Sand & Sea DSP.

You can get a stunning look by just embossing on the Pearlescent Specialty Paper.

For another card I highlighted the raised spots on the large die cut image using some Heat & Stick powder with the Gilded Leafing embellishment to make an elegant birthday card.

I created a card with the embossed background and added some sheen by sponging the Mossy Meadow cardstock with some Frost White Shimmer Paint. The shell and starfish were stamped on a piece of Sand & Sea Designer Series Paper before die cutting.


I sponged some Seaside Spray ink on Basic White cardstock which was embossed with the Painted Texture 3D folder to make it look like my seashells have been washed up on a sandy beach.

I used some blending brushes with the Pearlescent Specialty Paper to create realistic looking seashells and combined them with some of the beautiful Sand & Sea Designer Series Paper.

The coloured pearlescent shells also stand out well on a white embossed background.

I show you how to create this gorgeous card in my YouTube video below.

I've also made a few quick videos to show you how to get the best use out of the Sand & Sea dies and 3D embossing folder. You can see all of them on my C & C Designs channel.

There are so many things you can do with this fabulous collection that I am sure it will keep you crafting for a long time!

#KeepCalmAndCraft #ComputerAndCraftDesigns #StampinUp #CreativeTherapy #KeepStamping #RubberStamping #CardMaking


Saturday, 22 August 2020

Open Book Easel Card

I watched a video by a Canadian demonstrator, Tina Zinck, about the Open Book Easel Card technique. This method creates very impressive cards but it is a simple technique. Since I am spending more time at home due to the pandemic I finally got a chance to try this technique and now I am totally in love with Open Book Easel Cards!

You can make them for any occasion just by changing up the type of designer series paper and stamps you use. So far I have made six different cards using a variety of papers and colours, but I'm sure I'll be making lots more!
The first card I made used the Scripty 3D Embossing Folder on Gold Foil along with 'Tis the Season Designer Series Paper for the pages of the book. The front piece was from the new Wonder of the Season Specialty Designer Series Paper which has the words of a Christmas story written in gold foil. I decorated it with a gold embossed poinsettia and other embellishments from the Poinsettia Petals Bundle.
Next I made a 'friendship' card using products from the Snowflake Splendor Suite Collection with Silver Foil and Metallic Mesh Ribbon in shades of blue to match the Feels Like Frost Specialty Designer Series Paper. I used the new Lovely Labels Pick A Punch on the inside of the card to layer up the sentiment for the stand holder.
I used a gold foil edged card as the background for my Christmas Tree design. The layers were made from papers in the Most Wonderful Time Product Medley along with the stamps and dies. I used the Scripty 3D Embossing Folder to create the top layer and lightly sponged some Old Olive ink on the lettering to make it stand out. I made some Gold Foil ornaments for the Christmas tree using the little bauble die from the Little Treat Box Dies.
I then decided to make a monochrome card using some black and white music paper (retired from Stampin' Up!). I used a piece with the music and words for Deck the Halls as the front layer and I didn't feel I should cover it up, so I decorated around it with a garland made from the Wreath Builder Dies. I added a little bow with the Real Red Braided Linen Trim and embellished the wreath with Red Rhinestone Basic Jewels.
I made a smaller card using a Whisper White Notecard and some more of the music designer series paper. To make the unusual page shape I used Celebration Labels Dies. I used the Poinsettia Petals Bundle to embellish the front of the card.
For the final card I made a video using the World of Good Suite Collection. I made the page layers with designer series paper and some Memories & More cards.
I hope I have inspired you to make your own Open Book Easel Card and be warned . . . you will get addicted to making them!

Thursday, 9 July 2020

Cute mini suitcase which hides travel tissues!

As soon as I looked at the new catalogue I fell in love with the Playful Pets Suite from Stampin' Up! The dogs and cats on the Playful Pets designer series paper are so cute! They remind me of Disney movie characters and I couldn't wait to create something with them.

Playful Pets Designer Series Paper -- Product #152489
I had the perfect opportunity to work with this gorgeous paper when I was asked to make table gifts for an upcoming event, so I designed mini suitcases to fit packets of travel tissues. I decided to decorate them with the cute Pampered Pet images.


There is a set of matching Pet dies which fit the four animal images in the stamp set so you can easily cut them out with a die cutting machine. However, I fussy cut 50 dogs and cats out of a few pieces of the designer series paper and still had plenty of paper left over for other crafts!
There is a fifth die in the set that cuts out three cute little paw prints and I used them to decorate the bottom of my mini suitcases. I discovered there were little hearts in the centre of each paw print which I used as decoration as well. I was pleasantly surprised to find I could use the paw print die to cut out some of the hearts on the DSP. I also cut some of the matching dog and cat images with two of the dies.
I cut two little rectangle pieces of the designer series paper to decorate each suitcase and since the paper is double-sided I just turned it over to use the other image on the back side of the suitcase. 


The sentiment was stamped on a 3/4" piece of Whisper White cardstock and then I used the Lovely Labels Pick a Punch to make the ends look pretty before adding a couple little hearts.


I popped each element up with some dimensionals. I also added a little suitcase handle on the top using the smallest Stitched Rectangles Dies and re-cut it into a small rectangular strip before adding a couple Metallic Pearls to make it look like rivets holding a stitched leather handle on to the suitcase.


I sized my mini suitcases to fit the little travel tissues I bought at Yoyoso, which can easily be slipped out the open side to use.


Here is a video I made to show you how easy it is to make these cute little suitcases.


I hope you enjoyed this project and can see how easy it is to create a decorative holder for everyday objects. If there is a special project you'd like to see me make, please let me know in the comments!