Monday 30 March 2020

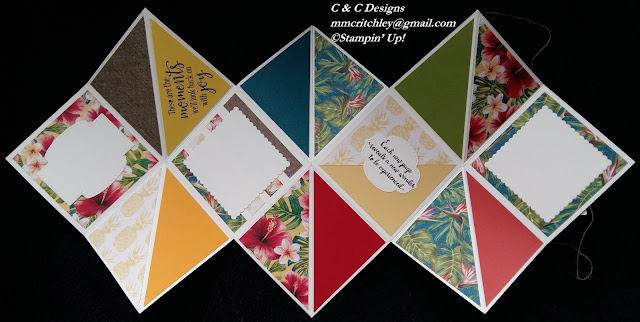
Squash Card Fun Fold

I was watching Sara Douglass' home crafting video last week and a card her daughter made reminded me of one I learned how to make 12 years ago when I was a Girl Guide Leader at the J'08 Christchurch Jamboree.

This style of fun fold is called a squash card because you squash it down to close it! Squash cards are perfect for scrapbooks, journals, photo albums or a special life event like retirement or a big birthday! I used my original card as an autograph book so I could collect contact details to keep in touch with all the wonderful people I met at the jamboree.

It is easy to create the base of this card . . . the hardest part is deciding how to decorate it!  So I got out some cardstock, designer series paper, stamps and ink and then a few hours later I had created a couple squash cards.


Here are photos showing the front and back of my two cards.


The smaller one was made with three 6" x 6" (15.2 cm square) pieces of Very Vanilla cardstock using the So Sentimental Bundle and Tropical Oasis designer series papers with coordinating colours.

I show you how to make the larger one in my video using two 8-1/4" x 8-1/4" (21 cm square) pieces of Whisper White cardstock. I decorated it with stamps from one of the 'host only' sets called New Wonders along with papers from the Pressed Petals Specialty Designer Series Paper, Come Sail Away Designer Series Paper and an envelope liner from the Magnolia Lane Memories & More Large Specialty Cards & Envelopes.


You can make your squash card any length you want by adding more squares. The finished size of the top will be half the size of the original square that you start with, i.e. a 4" x 4" starting square will give you a 2" x 2" finished card.


When you decorate the inside of the card you simply use squares which are slightly smaller than the finished card size and you can cut them in half at the diagonal for the triangular areas. For the small card I used 2-3/4" (7 cm) squares and the larger card was decorated with 4" (10 cm) squares.


I had lots of fun decorating these cards and I used a lot of colours. For a full list of the supplies have a look at the description under my YouTube video.
I hope you enjoyed this fun fold card and I'd love to see you make your own Squash Card!

#KeepCalmAndCraft #ComputerAndCraftDesigns #StampinUp #creativetherapy #StayHome #NewWonders #SquashCard #Scrapbook #TropicalOasis #PressedPetals #SoSentimental #Journal #AutographBook  #LargeCard

Thursday 26 March 2020

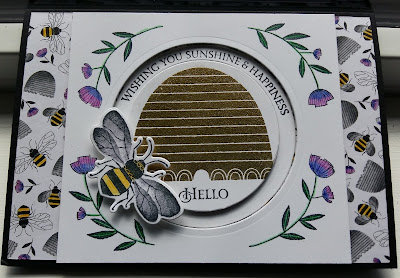
Spinner Cards -- Let your worries fly away!

Today is the first day of New Zealand's nationwide shutdown to prevent the spread of Covid-19 and I decided to make the most of my hibernation by creating videos each day. Yes, I said hibernation because I think the words isolation and lockdown sound too negative. Hibernation sounds more positive and better reflects the fact that I am going to sleep late, eat as much as I want, stay in my pyjamas all day and be a grumpy old bear if someone comes to my door!

Now is a perfect time to get my craft on by creating lots of cards and other papercrafts I have been wanting to make. Since I can't teach classes in my home at the moment I have decided to teach everyone for free via YouTube!

I had already made a Honey Bee spinner card sample for an upcoming class which has now been cancelled, so I re-created the spinner card using the Little Ladybug stamps.

The designer series paper I used on both cards is a free Sale-A-Bration item, so if you want some you'll need to place a qualifying order by March 31st.

The ladybug card uses the Flowering Foils Specialty Designer Series Paper and the bee card uses the Golden Honey Specialty Designer Series Paper.

Making a spinner card is fairly easy if you have the Layered Circle Dies. Just cut two different size circles in the middle of your cardstock and you are halfway there!

Stick a couple mini dimensionals on top of each other and attach them to a little circle (I used the 1/2" circle punch) and place it in the gap between the two die cut circles. Then attach your spinning image (ladybug or bee) to the dimensionals on the little circle.

I decorated the Whisper White front of the cards with images from the coordinating stamp sets and coloured them in -- Watercolor Pencils on the bee card and Stampin' Blends on the ladybug card. Then I popped them up on the front of the card bases using dimensionals, being careful not to impede the movement of the little spinner circle.

For the beehive I stamped it in Versamark ink and then heat embossed it with gold powder. I added some shimmer to the bee wings with a little Wink of Stella. The inside of the card was decorated simply with a sentiment and a large bee cut from the dies in Basic Black cardstock. I coloured the body of the bee with a Daffodil Delight watercolor pencil.

I decorated the inside of the ladybug card by using the four little ladybug stamp multiple times around the edge of the Whisper White cardstock before colouring them with Stampin' Write markers in Real Red and Petal Pink.
To see which colours I used on the front of the Little Ladybug spinner card, have a look at my video below.
All the products I used are listed under the video in the description. You'll also be able to see the images 'fly' by watching the video as well.

#SpinnerCard #LittleLadybug #HoneyBee #SaleABration #KeepCalmAndCraft #ComputerAndCraftDesigns #StampinUp #creativetherapy #StayHome

Sunday 22 March 2020

April Mailbag Make -- Poppy Wreath plus 3 Notecards!

In New Zealand and Australia we celebrate ANZAC Day on April 25th every year to remember those who have paid the ultimate sacrifice to keep our countries safe. ANZAC is the acronym for Australian and New Zealand Army Corps and was created in WWI.

A symbol of this remembrance day is a red poppy known as Flanders' Poppy, which was the first plant to re-emerge from the churned up soil of soldiers' graves during the First World War. Most people wear a cloth poppy on their shirt on ANZAC day, and during the week leading up to the ceremonies, as a sign of respect for those who have fought in wars.

I decided to create a wreath of poppies using the Poppy Moments dies with the intention of laying it at my local war memorial or putting on my front door. I thought maybe others would like to create poppy wreaths as well so I have made my design into a Mailbag Make. This is a perfect project to be doing at home with the kids or if you are not able to get out to craft classes. I have made each poppy a little bit different using a variety of techniques with the ink and glue.

The Poppy Wreath Mailbag Make includes everything you need to get crafting straight out of the mailbag! You will receive several die cut poppy and leaf elements as well as a Fine Tip Glue Pen, a bottle of Real Red Ink Refill and a sponge dauber. You will also get a link to a private instructional video showing you how to put everything together including tips and techniques using the ink refill.

Have a look at this 'sneak peak' video for more information and details on how to order.
I hope you like my project and find a way to celebrate ANZAC day on April 25th!

#Poppies #FlandersPoppy #AnzacDay #Wreath #RemembranceDay #KeepCalmAndCraft #ComputerAndCraftDesigns #StampinUp #creativetherapy #StayHome #MailbagMake 

Thursday 19 March 2020

Power of Hope Vellum Lantern

I love the look of paper lanterns and when I saw the Power Of Hope stamp set, available for free during Sale-A-Bration, I immediately thought of making one. I looked at some paper lanterns I had left over from attending the Auckland Lantern Festival in previous years and attempted to copy them in miniature.

I used a piece of petal pink vellum 5" x 4" (12.7 cm x 10 cm) for the little lantern and stamped the images in Memento back ink all around it between two 1/2" (1.25cm) score lines.

After the ink dried I cut 1/4" (0.5 cm) slices between the top and bottom score lines to create the curved lantern effect. I then glued the lantern sides together, overlapping one of the 1/4" (0.5 cm) slices.

I used a couple strips of petal pink cardstock 1/2" x 5" (1.25 cm x 12.7 cm)  to give it stability on the top and the bottom.

I hung a petal pink Best Dressed Tassel using gold thread at the bottom of the lantern. This also created a way to hold the battery-operated tealight. I also used a 1/4" x 6" (0.5 cm x 15.24 cm) piece of petal pink cardstock to create a handle at the top. 

Using three flowers from the Seasonal Layers Dies, I die cut the petal pink cardstock and vellum to decorate the little lantern, thus hiding my joins on the top and bottom strips.


I love the way this lantern came out and it was so easy to make. If you'd like to make one yourself, have a look at my video for instructions.
If you make a lantern I'd love to see it. Please post your pictures in the comments or on my Facebook page.


#Vellum #Lantern #Tealight #PowerOfHope #KeepCalmAndCraft #ComputerAndCraftDesigns #StampinUp #creativetherapy #StayHome #SaleABration

Sunday 1 March 2020

Mailbag Makes -- Craft Anywhere You Want!

I love teaching others how to make things with papercrafts. I have weekly classes in my home and participate in annual events with my upline, called Crafternoon. I have even started making videos to show people all over the world how to make things with Stampin' Up! products.

However I know that some people just can't make it to a class because the timing isn't right or they live too far away. Maybe, like me, they love to watch videos but unless they have the materials at hand they never make the projects they watch. My Pinterest is full of projects I'd love to make, but sometimes it takes too long to prepare the materials. I have the same problem when it comes to cooking -- the prep work takes too long and what I really enjoy is the eating!

So I have come up with a solution to those problems -- papercraft projects already prepared and ready to make mailed out to people which I am calling Mailbag Makes! I will do all the prep work and I will mail you all the pieces needed to make the project. You will get a link to a video of me showing you exactly how to create the featured papercraft. That way you can make the item(s) anytime and anywhere you like as you'll have everything you need ready and waiting for you, except for the stamps and ink.
Each month I will create a different project, ranging from cards to scrapbooks, home decorations, gifts, bags and boxes. The Mailbag Make will include all the cardstock, paper and embellishments you need to make the project. The price of the Mailbag Make will vary each month depending on how many supplies are need and it will not include the featured stamp set or inks, however you can purchase them for an extra fee or just use what you have at hand.
I am starting this offer with an antique-looking Memory Book. You can use this as a scrapbook by attaching your favourite photos to the pages or you could also use it as a diary because it includes 12 printed calendar months. Have a look at my preview video below to see the inside of the book and for more information on what's included.
Just contact me to order your Mailbag Make if you live in New Zealand, unfortunately I am unable to send products outside of my country. Next month I will have another project for sale as a Mailbag Make so check back then or join my email list so you can be notified as soon as the next one is available.

#KeepCalmAndCraft #ComputerAndCraftDesigns #StampinUp #creativetherapy #StayHome #MailbagMake #Scrapbook #DesignerSeriesPaper #MiniBooklet #MemoryBook #CraftHappy #PhotoAlbum