Find ideas, instructions and materials used to make a variety of paper-craft projects using Stampin' Up! products. As an independent Stampin' Up! demonstrator in New Zealand I love to share my passion for creating things with paper including cards, boxes, gifts and decorations. I find that making things is a fun and relaxing past-time which relieves stress and gives me a purpose to be active every day. If you have any questions or want to learn more about Stampin' Up! feel free to contact me.
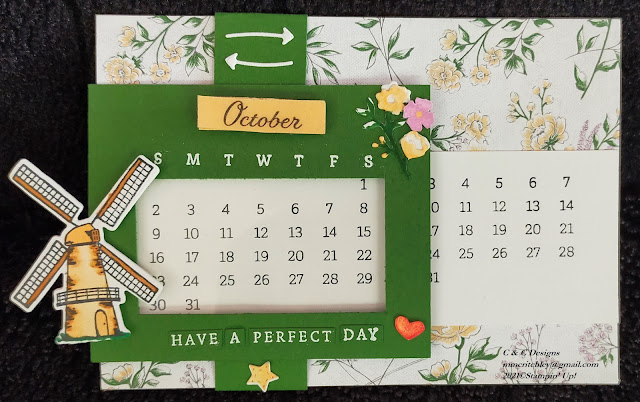
Ever since I got the Days To Remember photopolymer stamp set from Stampin' Up! I've been wanting to make a perpetual calendar. However I haven't had time to come up with my own idea and then I saw a fabulous sliding card designed by fellow demonstrator, Jessica Lewis. I changed her design to fit the A4 cardstock I was working with and used a different colour scheme and designer series paper (DSP) to make my perpetual calendar.
I used the image and dies from Nature's Harvest for January.
While making the card I had an idea to make it even more fun to use. I added a couple magnets to the left side of the slider so I could change out the image. I then stamped, coloured and cut out a dozen images on basic white cardstock. I put two magnets on the back of each image before covering them with some cardstock so they could be placed on the left of the slider each month.
I also stamped out the extra little images from the Days to Remember stamp set -- flower, star and heart -- cut them out of basic white cardstock and then put a little bit of Tombow Multipurpose Liquid Glue behind each, leaving the glue to dry. This made the glue tacky so the pieces could be repositionable. I put a piece of window sheet behind the opening so that I could put the extra pieces over any numbers not needed for the month I was viewing, like February.
February brings valentine's from the bear in the Count On Me stamp set.
March is my birthday month so I got a balloon from the Hey Birthday Chick stamp set!
I had a lot of fun searching through new and old stamp sets to find pictures I wanted for each month.
April is autumn here in New Zealand so a tree from Beauty of Friendship is perfect this month.
Celebrate Mother's Day in May with a bouquet of flowers from the Blessings of Home stamp set.
June is a chilly winter month here in New Zealand so I used a snow covered tree from the Cabin Dies.
Mid-winter means dreaming of far away places in July with the Sailing Home lighthouse.
August welcomes spring with Flowering Tulips coming through the cold ground.
Celebrate Father's Day in September here in New Zealand with a tie from Handsomely Suited.
October brings thoughts of upcoming summer holidays using the Tulip Fields Bundle.
Count On Me stamps return with a summery kangaroo for the month of November.
A little black kitty from the Sweet Little Stockings set reminds me that Christmas is coming.
Here in New Zealand our seasons and holidays are different than the rest of the world, so I chose a variety of animals, flowers and buildings for my calendar.
I also created a pocket inside with matching Heart & Home DSP so that I can easily store all my images.
I hope you like my card/calendar and if you'd like to make your own have a look at Jessica's video for instructions. Just make the few changes I mentioned above if you'd like yours to have interchangeable images like mine.
I love teaching others how to make things with papercrafts. I have weekly classes in my home and participate in annual events with my upline, called Crafternoon. I have even started making videos to show people all over the world how to make things with Stampin' Up! products.
However I know that some people just can't make it to a class because the timing isn't right or they live too far away. Maybe, like me, they love to watch videos but unless they have the materials at hand they never make the projects they watch. My Pinterest is full of projects I'd love to make, but sometimes it takes too long to prepare the materials. I have the same problem when it comes to cooking -- the prep work takes too long and what I really enjoy is the eating!
So I have come up with a solution to those problems -- papercraft projects already prepared and ready to make mailed out to people which I am calling Mailbag Makes! I will do all the prep work and I will mail you all the pieces needed to make the project. You will get a link to a video of me showing you exactly how to create the featured papercraft. That way you can make the item(s) anytime and anywhere you like as you'll have everything you need ready and waiting for you, except for the stamps and ink.
Each month I will create a different project, ranging from cards to scrapbooks, home decorations, gifts, bags and boxes. The Mailbag Make will include all the cardstock, paper and embellishments you need to make the project. The price of the Mailbag Make will vary each month depending on how many supplies are need and it will not include the featured stamp set or inks, however you can purchase them for an extra fee or just use what you have at hand.
I am starting this offer with an antique-looking Memory Book. You can use this as a scrapbook by attaching your favourite photos to the pages or you could also use it as a diary because it includes 12 printed calendar months. Have a look at my preview video below to see the inside of the book and for more information on what's included.
Just contact me to order your Mailbag Make if you live in New Zealand, unfortunately I am unable to send products outside of my country. Next month I will have another project for sale as a Mailbag Make so check back then or join my email list so you can be notified as soon as the next one is available.
I've finally finished my Christmas projects but I can't seem to stop crafting! So now I've turned my thoughts to the new year by making cute easel cards with mini calendars attached. The easel card design is simple and can be used for lots of different projects but here I use it to keep my sticky notes handy as well as a way for me to check the date!
For this project I used the Sailing Home cling stamps with the matching Smooth Sailing dies. I chose my colours from the Come Sail Away DSP -- Whisper White, Night of Navy and Mossy Meadow. On the first card I used an anchor from the Sail Away Trinkets, attaching it with a bit of the Night Of Navy/Sahara Sand Baker's Twine. My video shows how to use the smallest silver brad from the Metallic Brads to attach the hands to the compass.
The base of the easel is made from a 30.5 x 10.5 cm (12" x 4") piece of cardstock scored at 15.25 cm and 7.6 cm (6" and 3"). Glue a 15.25 x 10.5 cm (6" x 4") piece of coloured cardstock to the bottom half of the front of the card and a 14.25 x 9.5 cm (5-3/4" x 3-3/4") piece to the inside of the card. Glue a 14.25 x 9.5 cm (5-3/4" x 3-3/4") piece of designer series paper to the coloured front mat.
Glue the mini calendar to a piece of coloured cardstock which is slightly larger than the calendar, in my case that was a 7.6 x 5 cm (3" x 2") piece. You should be able to purchase the mini calendars online from a store in your country, however they need to be bought several months before the end of the year. Alternatively, you could print out your own and staple the months together. Glue the mini calendar to the dsp on the front of the card towards the bottom.
Stamp a piece of Whisper White cardstock with images from the Sailing Home stamp set and cut them out using the Smooth Sailing dies or the 3.8cm (1-1/2") Circle Punch depending on the images you stamp. You can also cut out images from coloured cardstock with the dies, such as the hands of the compass, the ship's wheel or the rope.
You can see exactly how to make one of these cards on my video here.
I taught this card at one of my Parent & Child classes recently, but we made it with the Good Morning Magnolia Bundle (Good Morning Magnolia Cling Stamp Set and the Magnolia Memory Dies). Some participants chose to stamp the image while others created a 3-D magnolia using the dies.
This would be a perfect gift for someone or make it for your desk so you have some note paper handy and will always know the date!