Showing posts with label image. Show all posts

Monday, 4 May 2020

Many different features and uses of Stampin' Up! punches

Stampin' Up! punches are well made and heavy compared to other companies but that is only one of the many features of these fabulous products. There is so much to say about these punches that I have made three short videos to explain everything and I have included them throughout this blog post.

My Stampin' Up! Punches Stacked
All the punches have a locking mechanism which allows them to be locked in the closed position for easy transportation and storage. You simply slide the dark grey lock towards the punch hole to unlock, which allows it to open up for use. To lock the punch, just hold it closed and slide the grey plastic towards the front of the punch. This keeps it flat so you can store the punch stacked on a shelf or in a drawer.

The shapes and sizes of some punches -- the two on the far left are unlocked and the rest are locked and stacked.
The image on the top of each punch shows the actual size of the item that will be created when you use the punch. The front, angled edge of the punch has a small picture of the image as well, so you can easily find the punch when they are stacked.


When I first get a new punch I use it on some cardstock so I can test how it works. I am then left with a template which is very useful when designing my projects.

Punch templates are handy when designing a project as you can use them to choose the correct size for your sentiments.
I can place the template over my cardstock to see how the image will fit my project. I can also use the templates to determine which size label punch will fit the sentiments I want to use.

Some cards and papercraft projects with the punches I used to make them.
The templates are also very useful when using a punch that has more than one image. Place the stamps on top of the cutout sections of the template (the negative space) to arrange them so they will perfectly fit in the punch after you have stamped the cardstock.


I show you how to do this with the Hot Air Balloon punch in this video.


Stampin' Up! punches are strong and durable but sometimes they do get dull with a lot of use. You can sharpen them easily by punching some aluminium as shown in my next video.


You can use the image you have leftover after sharpening to make some interesting projects. Here I have made some flowers with the daisy and leaf punches. I just attached the metal images to some green wire and gently shaped the flowers with a bone folder and my fingers.

Some little metal flowers and leaves made from aluminium cans, wire and buttons.
I hope you've learnt some things about using punches from this post and my videos. Punches are great tools for enhancing your cards and to complement your projects!

#KeepCalmAndCraft #ComputerAndCraftDesigns #StampinUp #creativetherapy #StayHome #Punches

Sunday, 5 May 2019

Quick and Easy Crafting with Kits


Sometimes I lose my crafting mojo and even though I can find lots of beautiful things to create online, when I sit down at my table I feel overwhelmed. That is when a kit comes to the rescue!

Much like going to a class, a kit provides you with everything you need to make several projects. The only thing missing is the teacher and classmates, but sometimes I just want to be alone and do my crafting in the comfort of my pajamas. I certainly can't do that at a class! 😉

When I became an independent Stampin' Up! demonstrator over 2 years ago I bought a couple kits from the current catalogue. I followed the instructions and made all the cards exactly as shown in the pictures. This quickly gave me a large quantity of cards to offer for sale at the craft markets I started attending and I didn't have to invest a lot of money in full products to make things.

Cards from 2017-18 All-Inclusive Kits
Now that I am a 'seasoned' demonstrator I still use kits for a variety of reasons. Even though Stampin' Up! offers a multitude of coordinating products and has a beautiful catalogue with hundreds of fabulous project ideas sometimes I just need something quick and easy to do. That is why the kits come in different styles, depending on what the crafter wants and needs -- all-inclusive kits, project kits and limited-time kits.

Different kits from the 2018-19 catalogues
I love kits because of the versatility of the products they have which allows me to make cards quickly or I use the items to create other projects. Using a kit is a great way to try different things without having to purchase a full set of products. With a kit you can use different embellishments, such as twine, vellum, glitter paper, foil paper, pearls, ribbons, dsp and dimensionals. Some kits also have different shapes and sizes of cards and envelopes as well as different cardstock colours. The other great thing is you get to play with cutout shapes without having a die cutting machine or a punch.

Another wonderful benefit of using kits is you get exclusive products which usually cannot be purchased separately. Each kit comes with an ink spot, cards, envelopes and embellishments created just for that kit. So purchasing several kits with different ink colours will allow you to collect a supply of ink without having to invest in the full-size ink pads. I personally prefer using ink spots with the Stamparatus as it creates less mess on the plates. The spots are also easier to travel with.

The 'All-Inclusive' kits come with everything you need to make the cards -- stamps, ink, cards, envelopes, embellishments and dimensionals. These kits are great for 'on the go' crafting as you have everything you need except for scissors, Tombow multipurpose liquid glue or Tear & Tape adhesive. The supplies usually come in a sturdy box for easy storage or you can use the box as gift packaging when you complete your kit. The kits usually come with matching envelopes so you are ready to post the cards once you are done. When you complete an 'all-inclusive' kit you then have stamps and an ink spot to use for other projects which is why these kits cost a bit more than other kits.

Made To Bloom all-inclusive card kit #148537 $57 NZD
Lots of Happy all-inclusive card kit #146388 $74 NZD
Soft Sayings all-inclusive card kit #145466 $74 NZD
The 'Project' kits do not come with stamps as the stamp set is sold separately. So you can use any stamp set you have to complete the cards in this type of kit or you can purchase the recommended stamp set to make them as shown in the instructions. The benefit of having the stamp set separate from the kit is that you can purchase more than one kit if you wish to make a lot of cards and you won't end up with duplicate stamps. Sometimes these kits include an exclusive item, such as the clear storage box in the 'Incredible Like You' project kit. You will need to use your own scissors, adhesive, inks and stamps to complete the cards in a project kit, however that is reflected in the lower price.

Incredible Like You project kit #148552 $57 NZD
Matching Incredible Like You stamp set #148708 $36 NZD
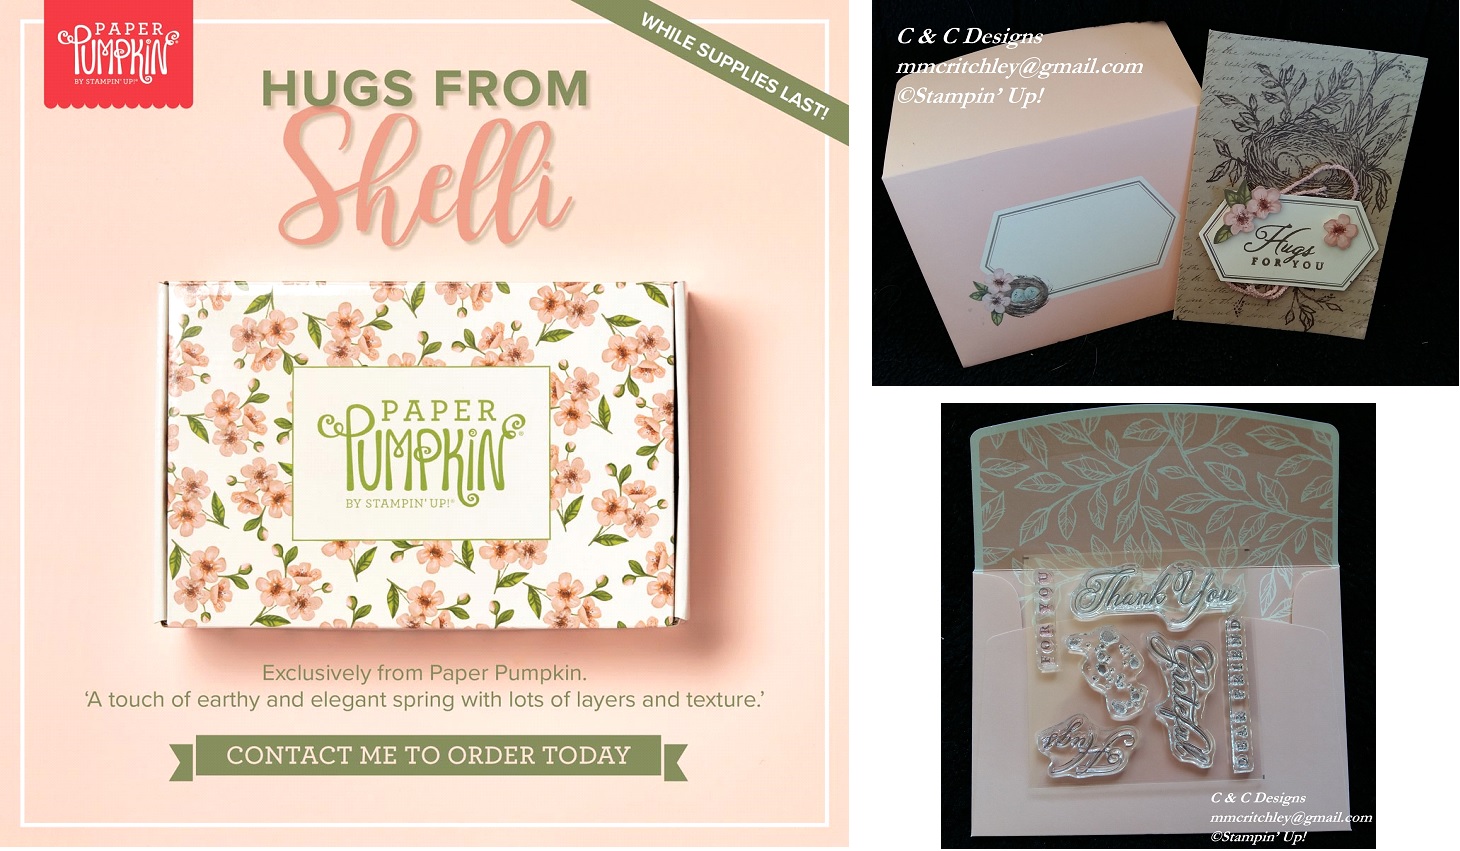
Occasionally Stampin' Up! comes out with limited-time offers and on May 15th there will be an exclusive kit offered here in New Zealand. In the USA and Canada, crafters can subscribe to a stamping kit from Paper Pumpkin which has exclusive Stampin' Up! products in it each month. However for one time only, we will be able to get a kit from Paper Pumpkin which is called the 'Hugs From Shelli' kit and it will include an exclusive stamp set not available anywhere else, one Classic Stampin’ Spot®, paper and crafting materials to create 12 cards (3 cards of 4 unique designs), 12 coordinating envelopes, adhesives and embellishments for all 12 cards in a decorated storage box.

This kit was created with the help of Shelli Gardner, co-founder of Stampin' Up! It will only cost $44 NZD and is available for a limited time, so if you'd like one of these kits please let me know asap as when they sell out they will be gone forever. The Paper Pumpkin kits are always a surprise so I can't show you what will be in it as I don't know, however I was lucky enough to get to make one of the exclusive cards when I attended OnStage last month and I even got to keep the photopolymer stamps!


Hugs from Shelli Paper Pumpkin kit #152032 $44 NZD
When I am pressed for time, I sometimes use a kit for one of my classes so I don't have to prep all the different elements for the cards. Kits are also wonderful if you need a lot of a similar cards made quickly, such as birthday or thank you cards. Sometimes just making a few cards from a kit can get my mojo going so I can then get back into my creative groove!

#ComputerAndCraftDesigns #StampinUp #creativetherapy #PaperCraftIdeas #HandmadeGifts #HandmadeCard #PapercraftKit

Saturday, 27 April 2019

Stamping Outside the Paper!

I know the title of my blog is Papercraft Addiction, but sometimes I need to do crafting without paper. Crazy thought, I know! However I did used ink and stamps, so it's still a hand-craft.

I watched a video online and then attended my upline's technique class to learn how to stamp on to a ceramic mug. The main things you need to know to do this technique are that you use StazOn ink and bake the mug at 180 degrees Celsius for at least 20 minutes to make the ink stick to the mug. You can then colour the image with Stampin' Blends and re-bake it to fix the ink to the mug. However I am not sure the image would stay on if you wash the mug in a dishwasher, but I don't have one so I can't test that theory.

At the class I attended I was able to get a good image after only a couple tries and then I was asked to help other students as I seemed to have mastered the technique. I was so impressed with how easy it seemed that I went out and bought 10 mugs so I could make some to sell at my monthly craft markets.

Well, I don't know what happened from when I learned the technique to the day I tried to stamp my own mugs because it seemed so simple before, but when I was doing it at my own home I kept having problems. Fortunately I could wipe off the ink before it dried and try, try, try, try again!

I think my first problem was that I attempted to put too many images on the mug in one go. The mug kept slipping and smearing the images. I then decided to only use a couple of stamps and eventually I got an image that I was happy with. I thought I had finally figured out the correct pressure, angle, and speed, but no! I continued to wipe off more ink than I kept on the mugs.

I would say this technique is best for patient people or stubborn ones like me, as I was determined to get all 10 mugs stamped! My frustrations were increasing as I couldn't understand why it had been so easy the first time I did it only the week before.

I learned a lot from my mistakes though, like the images don't go on straight because the mug is curved. That is why most of my sentiments are at quirky angles, but I think it looks like it was meant to be that way. At least that's my story and I'm sticking with it!

Finally with multiple adjustments in stamp placement . . . trying it while standing . . . trying it while sitting . . . rolling the mug from the left . . . from the right . . . and even backwards . . . I was finally able to get all 10 mugs stamped and baked.

The next step was to colour them. Although after having so much trouble stamping the images I was afraid of messing them up, but I persevered. I used the Stampin' Blends to colour each mug. I started with the easy one -- the panda holding a balloon. Then I coloured the daffodils and discovered that even though the mugs had been 'heat set' in the oven the Blends would smear the black ink if I rubbed too hard or too long in one spot.

After a bit of a learning curve, I finally got the hang of how to colour each mug without ruining the image. I even found out that the Color Lifter works like an eraser to remove the ink, even the black ink which had already been baked on. It was really handy in fixing some of the smeared images. And if I didn't like the colour/shade I used I could go over it with a different colour and the previous ink would come off.

So here are the final, coloured mugs which I hope to sell at my markets. I am a bit worried that the images will come off when the mugs are washed so I think I will add a note to them saying they should be gently hand-washed.
Since I didn't use paper maybe I should change the name of my blog to Stamping Addiction or Try Try Again Crafting or Trying Crafter or just Stubborn Crafter Who Won't Give Up! What do you think?

#ComputerAndCraftDesigns #StampinUp #creativetherapy #PaperCraftIdeas #HandmadeGifts