Showing posts with label organizing. Show all posts

Sunday, 5 May 2019

Quick and Easy Crafting with Kits


Sometimes I lose my crafting mojo and even though I can find lots of beautiful things to create online, when I sit down at my table I feel overwhelmed. That is when a kit comes to the rescue!

Much like going to a class, a kit provides you with everything you need to make several projects. The only thing missing is the teacher and classmates, but sometimes I just want to be alone and do my crafting in the comfort of my pajamas. I certainly can't do that at a class! 😉

When I became an independent Stampin' Up! demonstrator over 2 years ago I bought a couple kits from the current catalogue. I followed the instructions and made all the cards exactly as shown in the pictures. This quickly gave me a large quantity of cards to offer for sale at the craft markets I started attending and I didn't have to invest a lot of money in full products to make things.

Cards from 2017-18 All-Inclusive Kits
Now that I am a 'seasoned' demonstrator I still use kits for a variety of reasons. Even though Stampin' Up! offers a multitude of coordinating products and has a beautiful catalogue with hundreds of fabulous project ideas sometimes I just need something quick and easy to do. That is why the kits come in different styles, depending on what the crafter wants and needs -- all-inclusive kits, project kits and limited-time kits.

Different kits from the 2018-19 catalogues
I love kits because of the versatility of the products they have which allows me to make cards quickly or I use the items to create other projects. Using a kit is a great way to try different things without having to purchase a full set of products. With a kit you can use different embellishments, such as twine, vellum, glitter paper, foil paper, pearls, ribbons, dsp and dimensionals. Some kits also have different shapes and sizes of cards and envelopes as well as different cardstock colours. The other great thing is you get to play with cutout shapes without having a die cutting machine or a punch.

Another wonderful benefit of using kits is you get exclusive products which usually cannot be purchased separately. Each kit comes with an ink spot, cards, envelopes and embellishments created just for that kit. So purchasing several kits with different ink colours will allow you to collect a supply of ink without having to invest in the full-size ink pads. I personally prefer using ink spots with the Stamparatus as it creates less mess on the plates. The spots are also easier to travel with.

The 'All-Inclusive' kits come with everything you need to make the cards -- stamps, ink, cards, envelopes, embellishments and dimensionals. These kits are great for 'on the go' crafting as you have everything you need except for scissors, Tombow multipurpose liquid glue or Tear & Tape adhesive. The supplies usually come in a sturdy box for easy storage or you can use the box as gift packaging when you complete your kit. The kits usually come with matching envelopes so you are ready to post the cards once you are done. When you complete an 'all-inclusive' kit you then have stamps and an ink spot to use for other projects which is why these kits cost a bit more than other kits.

Made To Bloom all-inclusive card kit #148537 $57 NZD
Lots of Happy all-inclusive card kit #146388 $74 NZD
Soft Sayings all-inclusive card kit #145466 $74 NZD
The 'Project' kits do not come with stamps as the stamp set is sold separately. So you can use any stamp set you have to complete the cards in this type of kit or you can purchase the recommended stamp set to make them as shown in the instructions. The benefit of having the stamp set separate from the kit is that you can purchase more than one kit if you wish to make a lot of cards and you won't end up with duplicate stamps. Sometimes these kits include an exclusive item, such as the clear storage box in the 'Incredible Like You' project kit. You will need to use your own scissors, adhesive, inks and stamps to complete the cards in a project kit, however that is reflected in the lower price.

Incredible Like You project kit #148552 $57 NZD
Matching Incredible Like You stamp set #148708 $36 NZD
Occasionally Stampin' Up! comes out with limited-time offers and on May 15th there will be an exclusive kit offered here in New Zealand. In the USA and Canada, crafters can subscribe to a stamping kit from Paper Pumpkin which has exclusive Stampin' Up! products in it each month. However for one time only, we will be able to get a kit from Paper Pumpkin which is called the 'Hugs From Shelli' kit and it will include an exclusive stamp set not available anywhere else, one Classic Stampin’ Spot®, paper and crafting materials to create 12 cards (3 cards of 4 unique designs), 12 coordinating envelopes, adhesives and embellishments for all 12 cards in a decorated storage box.

This kit was created with the help of Shelli Gardner, co-founder of Stampin' Up! It will only cost $44 NZD and is available for a limited time, so if you'd like one of these kits please let me know asap as when they sell out they will be gone forever. The Paper Pumpkin kits are always a surprise so I can't show you what will be in it as I don't know, however I was lucky enough to get to make one of the exclusive cards when I attended OnStage last month and I even got to keep the photopolymer stamps!
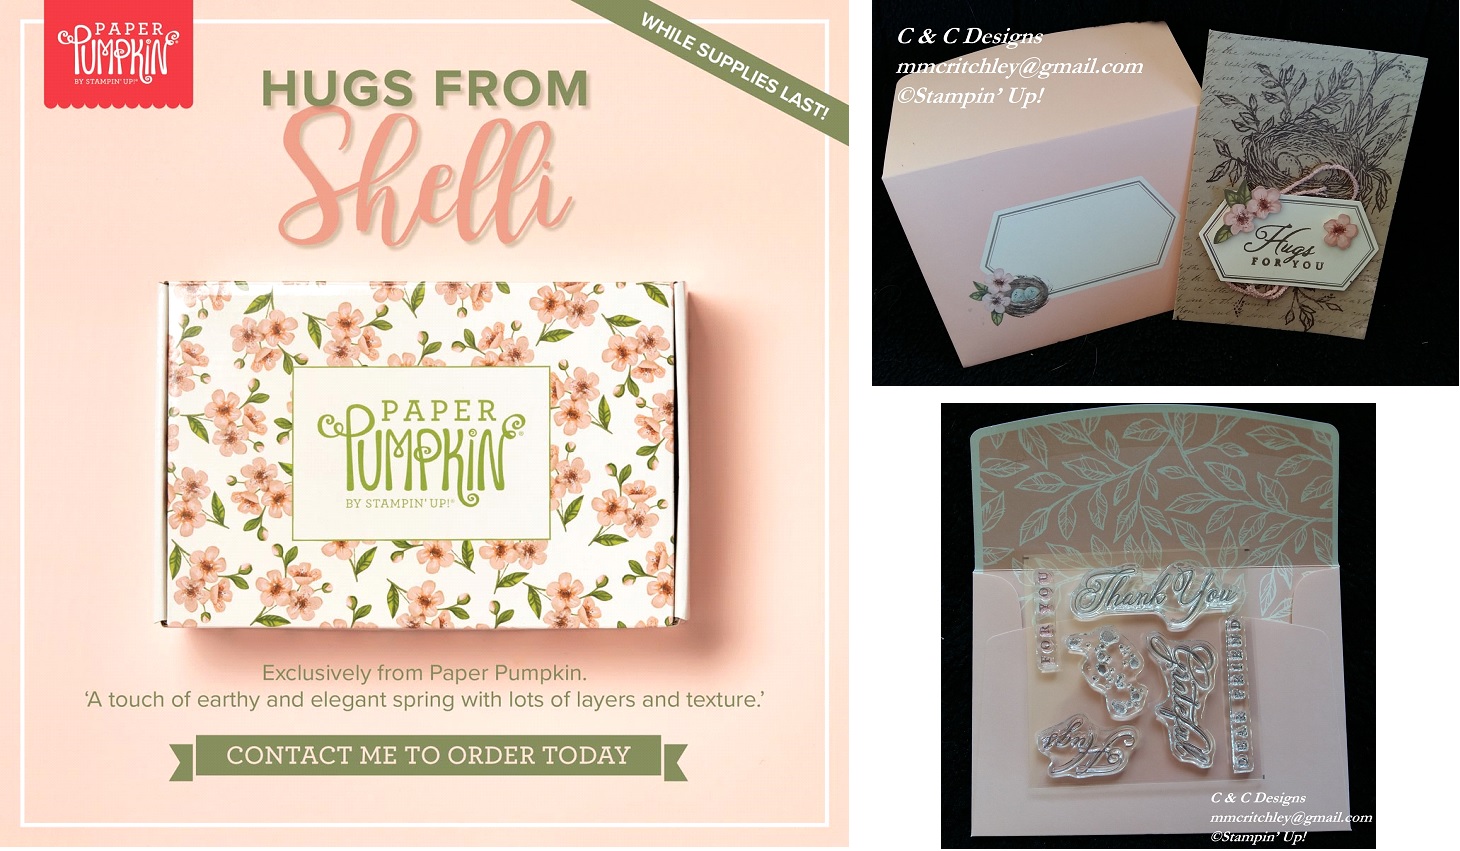

Hugs from Shelli Paper Pumpkin kit #152032 $44 NZD
When I am pressed for time, I sometimes use a kit for one of my classes so I don't have to prep all the different elements for the cards. Kits are also wonderful if you need a lot of a similar cards made quickly, such as birthday or thank you cards. Sometimes just making a few cards from a kit can get my mojo going so I can then get back into my creative groove!

#ComputerAndCraftDesigns #StampinUp #creativetherapy #PaperCraftIdeas #HandmadeGifts #HandmadeCard #PapercraftKit

Wednesday, 3 April 2019

Creative Space

When making papercrafts you need a place to do your creating. Some people are lucky enough to have a large house with a dedicated room or maybe even a converted garage or sleepout which has been made into a craft room. However I suspect many people are probably like me and have to find space to create where ever they can.

When my children were still living at home, I used to keep everything in boxes in a closet and get things out only when I was making a project. I would take over the dining table during the day but I would have to clean everything up each evening in time for dinner. However sometimes I wasn't finished creating, so I would leave everything on the table and my family would have to eat on their laps siting on the couch or in their bedrooms. I guess I wasn't going to get the Mother-of-the-Year award!

The bad thing about crafting out of a closet is that I didn't always know where things were. Sometimes I knew I had a specific item I needed but I couldn't find it so I would just buy another one. That is how I ended up with so many 'googly' eyes -- every Christmas when I went to make candy cane reindeer I couldn't find the eyes! And now I have lots of other things I forgot I had bought.

When I became an independent Stampin' Up! demonstrator I wanted to have everything easily accessible. So I created some space using an old computer desk in the hallway. I was able to store all my stamps on the top shelves of the desk and my other bits and bobs on the lower shelves where the computer and printer used to sit. Having the pull-out keyboard drawer was handy for storing my Stampin' Trimmer.

This setup worked well for a little while as I was able to find things readily, and except for having to use the dining table for my Big Shot, I made things quickly and easily. It was nice to sit in one spot and reach everything I needed. I did have less space to spread out than what I had with the dining table, though sometimes I would use that space as well.

The only problem with that setup was I am a night owl and I do most of my creative work from 8 pm until after midnight. However my desk was right outside my daughter's bedroom and she would often yell at me to turn the hallway light off and stop making noise as she was trying to get some sleep. So here's a tip . . . do not setup your creative space in an area which will impact others!

So I then moved into a room which was vacated by my other daughter when she moved out. You would think I'd have plenty of space to be creative, but no! Half of the room was full of furniture and belongings she had left behind, including a drum set. I piled all of her belongings on one side of the room and made a little pathway through the middle of the room so I could access a large table to make cards and other projects. This worked for a little while until I acquired too many stamping supplies, if that is even possible! 😜


I slowly got rid of some of the belongings and sold the drum set so I was finally able to access more of the room. After a year of clearing out things, and acquiring more Stampin' Up! products, I had made a decent area to call my craft space. I still have some work to do to get the room completely organised along with painting the walls and fixing the closet doors, but it is a good start. I have big plans for my craft room!

I now have all my stamp sets stacked alphabetically and my other supplies are in drawers or on shelves within easy reach of my desk chair. I bought a small trolley for my Big Shot which has drawers to store accessories and it can be wheeled out to the dining room when I hold my weekly classes. And now that Stampin' Up! is offering modular storage, I will be able to tailor my creative space to my way!